Introduction
Close your eyes and listen. In the soundscape of the modern workspace, you can often hear the sharp, high-pitched rattle of standard-issue office keyboards. Now, contrast that with a sound you might have heard in a video online—a rhythmic, satisfying, and almost organic thock-thock-thock. That deep, resonant sound is no accident. It is the carefully crafted voice of a custom mechanical keyboard, and it has become a phenomenon, an oddly satisfying symphony for the ears.
For many, the journey into mechanical keyboards begins with the desire to replicate that perfect sound, only to be met with a hollow, tinny, or clacky reality. What’s the secret? A keyboard’s sound profile is a complex interplay of every single component working in concert. It is an art form where physics meets personal preference, and where customization transcends simple aesthetics. This ultimate guide will serve as your deep dive into the world of keyboard acoustics. We will demystify the science behind the sounds, explore the components that shape your keyboard’s voice, and detail the essential modifications that can transform your board from a generic tool into a personalized instrument.
The Heart of the Sound: Switches, Lube, and Films
The journey to your perfect sound profile begins with the switches. They are the primary engine of the sound, but their inherent character is only the starting point for a deep level of customization.
Switch Type and Materials
The three main types—Linear, Tactile, and Clicky—form the foundation of your sound. Clicky switches (like Cherry MX Blues) are purpose-built to be loud and high-pitched. The real artistry, however, lies in tuning Linear (e.g., Reds) and Tactile (e.g., Browns) switches. Their sound is generated by the plastic stem hitting the bottom of the housing (“bottom out”) and returning to the top (“top out”).
The plastic used for the switch housing also plays a massive role. A housing made of Nylon will have a softer, deeper sound signature. A Polycarbonate (PC) housing is harder and more rigid, often resulting in a higher-pitched, clackier sound. The most sought-after switches, like those made from a custom POM blend, aim for a unique smoothness and a balanced, solid sound.
The Magic of Lubricant
Why are enthusiasts so obsessed with lubricating their switches? The difference is night and day. A thin layer of specialized lubricant applied to the switch’s internal components does three critical things:
- Eliminates Friction: Lube removes the scratchy feeling present in many stock switches, resulting in a buttery-smooth keypress.
- Dampens Unwanted Noise: It gets rid of “spring ping”—that faint metallic ringing you might hear—and the rustle of the plastic stem.
- Deepens the Sound: Most importantly for acoustics, lube deepens the sound profile. It adds mass and cushion to the impact points, turning a high-pitched “clack” into a more subdued, lower-pitched “thock.” The key is that less is more; over-lubing can make a switch feel sluggish and mushy.
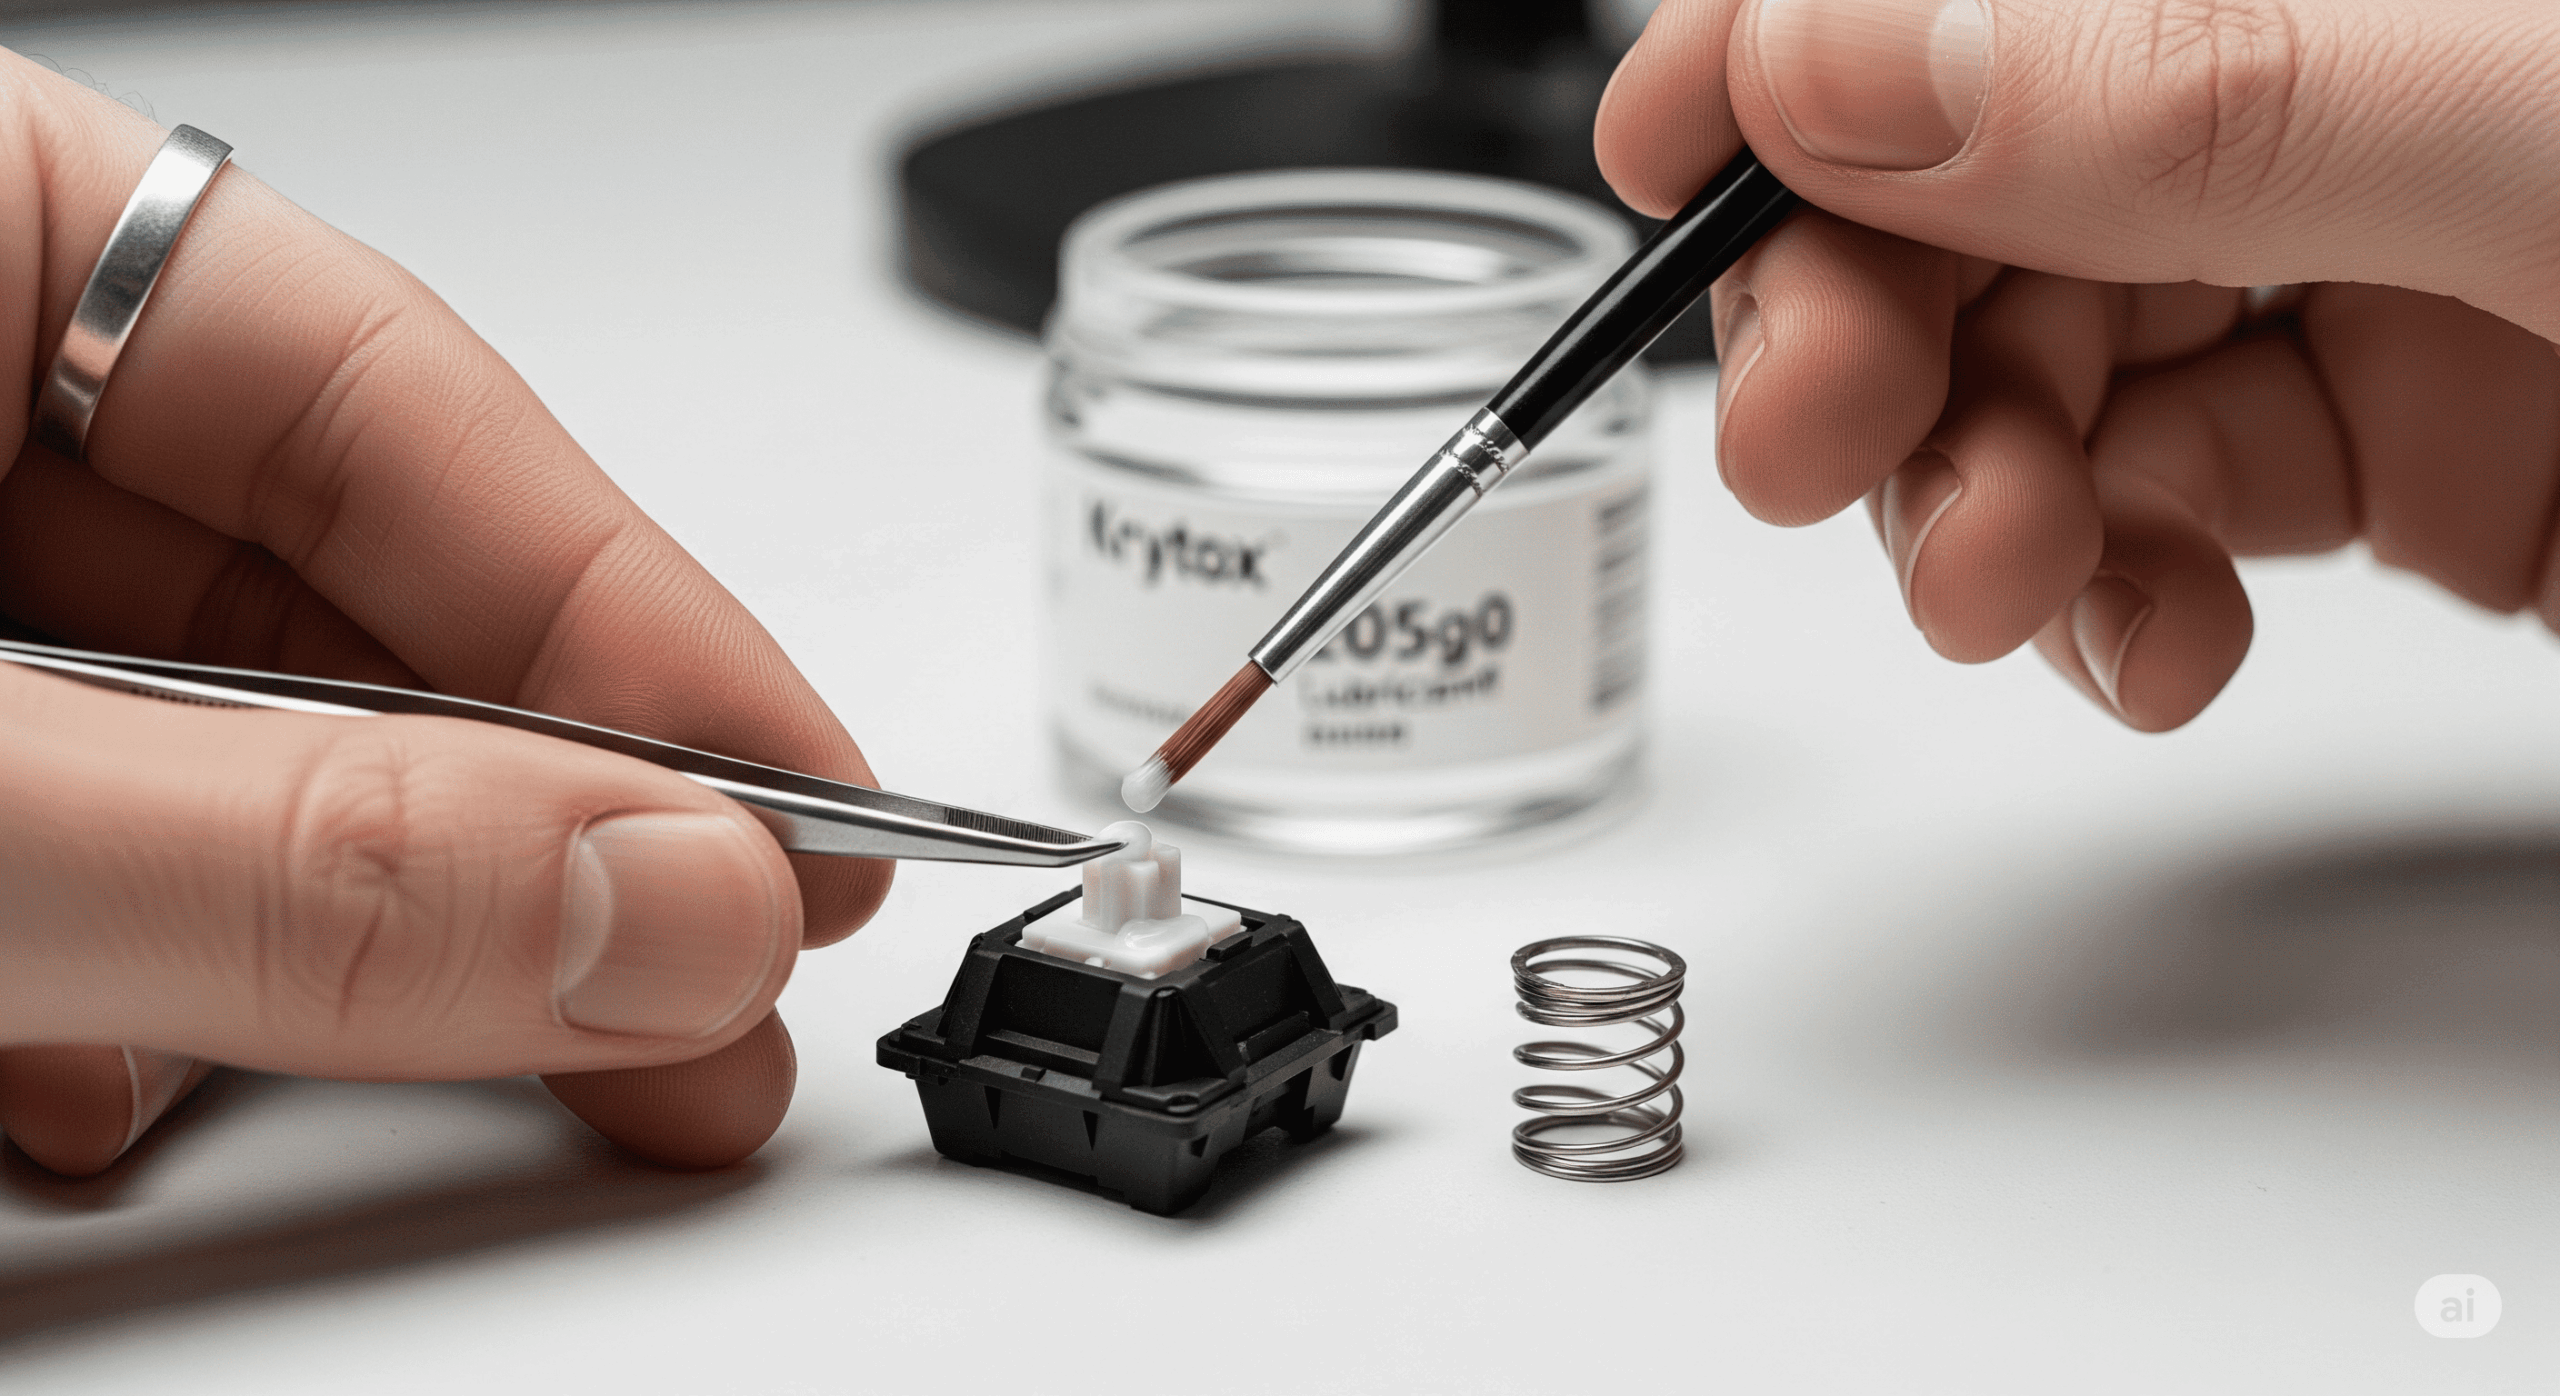
A Note on Switch Films
For an even tighter and more consistent sound, many enthusiasts add “switch films.” These are tiny, thin sheets of plastic or rubber placed between the top and bottom housing of a switch. They tighten the tolerances, reducing any wobble between the housing pieces and further dampening vibrations, which helps to focus the sound and make it more solid.
The First Point of Impact: Keycaps
If switches are the heart of the sound, keycaps are the vocal cords. The material, thickness, and profile of your keycaps have a massive impact on the final sound signature.
Let’s revisit Leo, our budding keyboard enthusiast. After lubing his switches, his keyboard sounded better, but still not quite right. He realized his thin ABS keycaps were the problem. After switching to a set of thick, PBT keycaps in a tall, sculpted SA profile, the sound finally transformed into the deep, resonant tone he was searching for.
Thickness and Profile also matter. Thicker keycaps have more mass and produce a deeper sound. Taller, more sculpted profiles like SA and MT3 have a larger internal volume, which acts as a resonance chamber, creating a uniquely deep, vintage-sounding “thock.” In contrast, the shorter, more common Cherry and OEM profiles offer a more controlled, poppier sound.
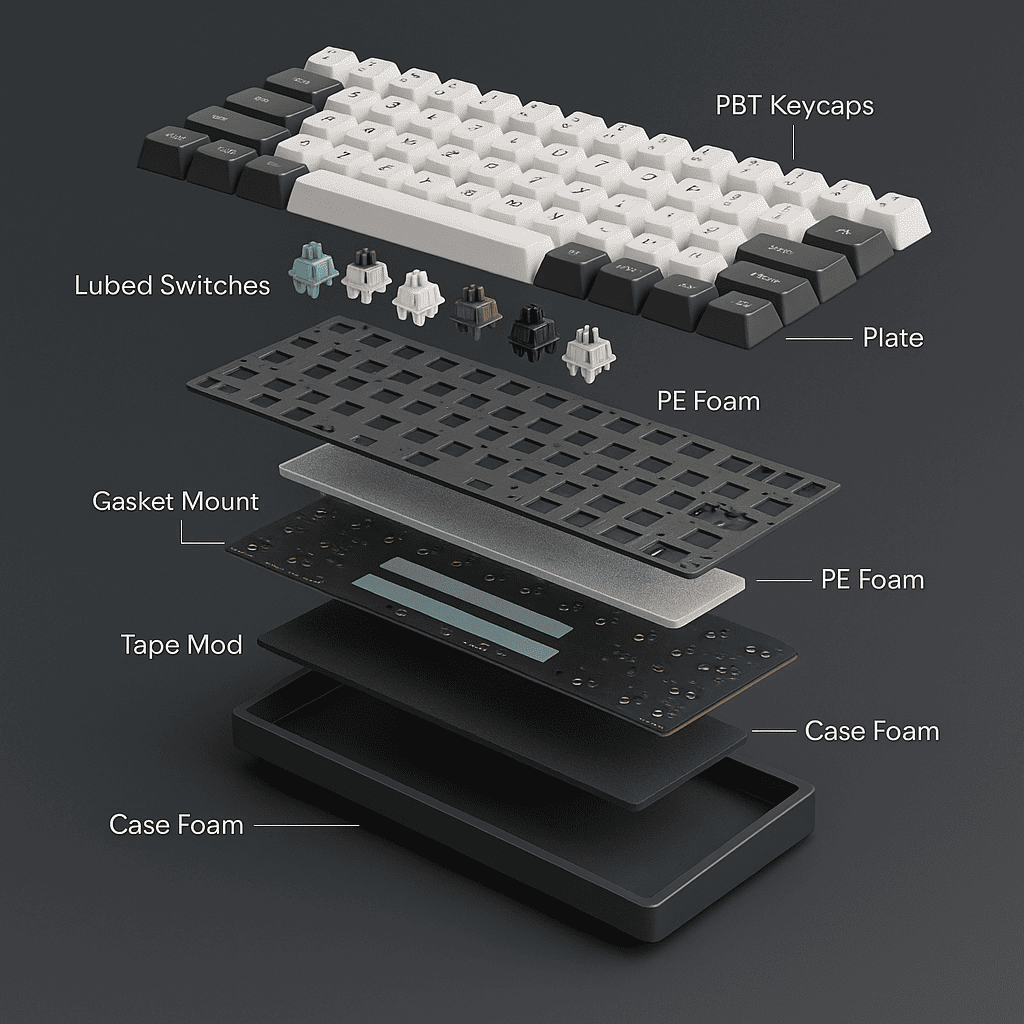
The Echo Chamber: Case, Plate, and Mounting Style
The sound generated by the switch and keycap needs a place to resonate. The keyboard’s case, plate, and mounting style act as this acoustic chamber, amplifying and coloring the sound in significant ways.
- Case Material: An aluminum case will sound different from a plastic one. Plastic cases can sound hollow if untreated, while aluminum can produce a clean, sometimes higher-pitched sound. Polycarbonate cases are often sought after for their ability to produce a deeper, more muted sound profile.
- Plate Material: The plate holds the switches. Hard materials like Brass or Steel create a stiff typing feel and a higher-pitched sound. Softer materials like Polycarbonate or FR4 absorb more vibration, leading to a deeper sound.
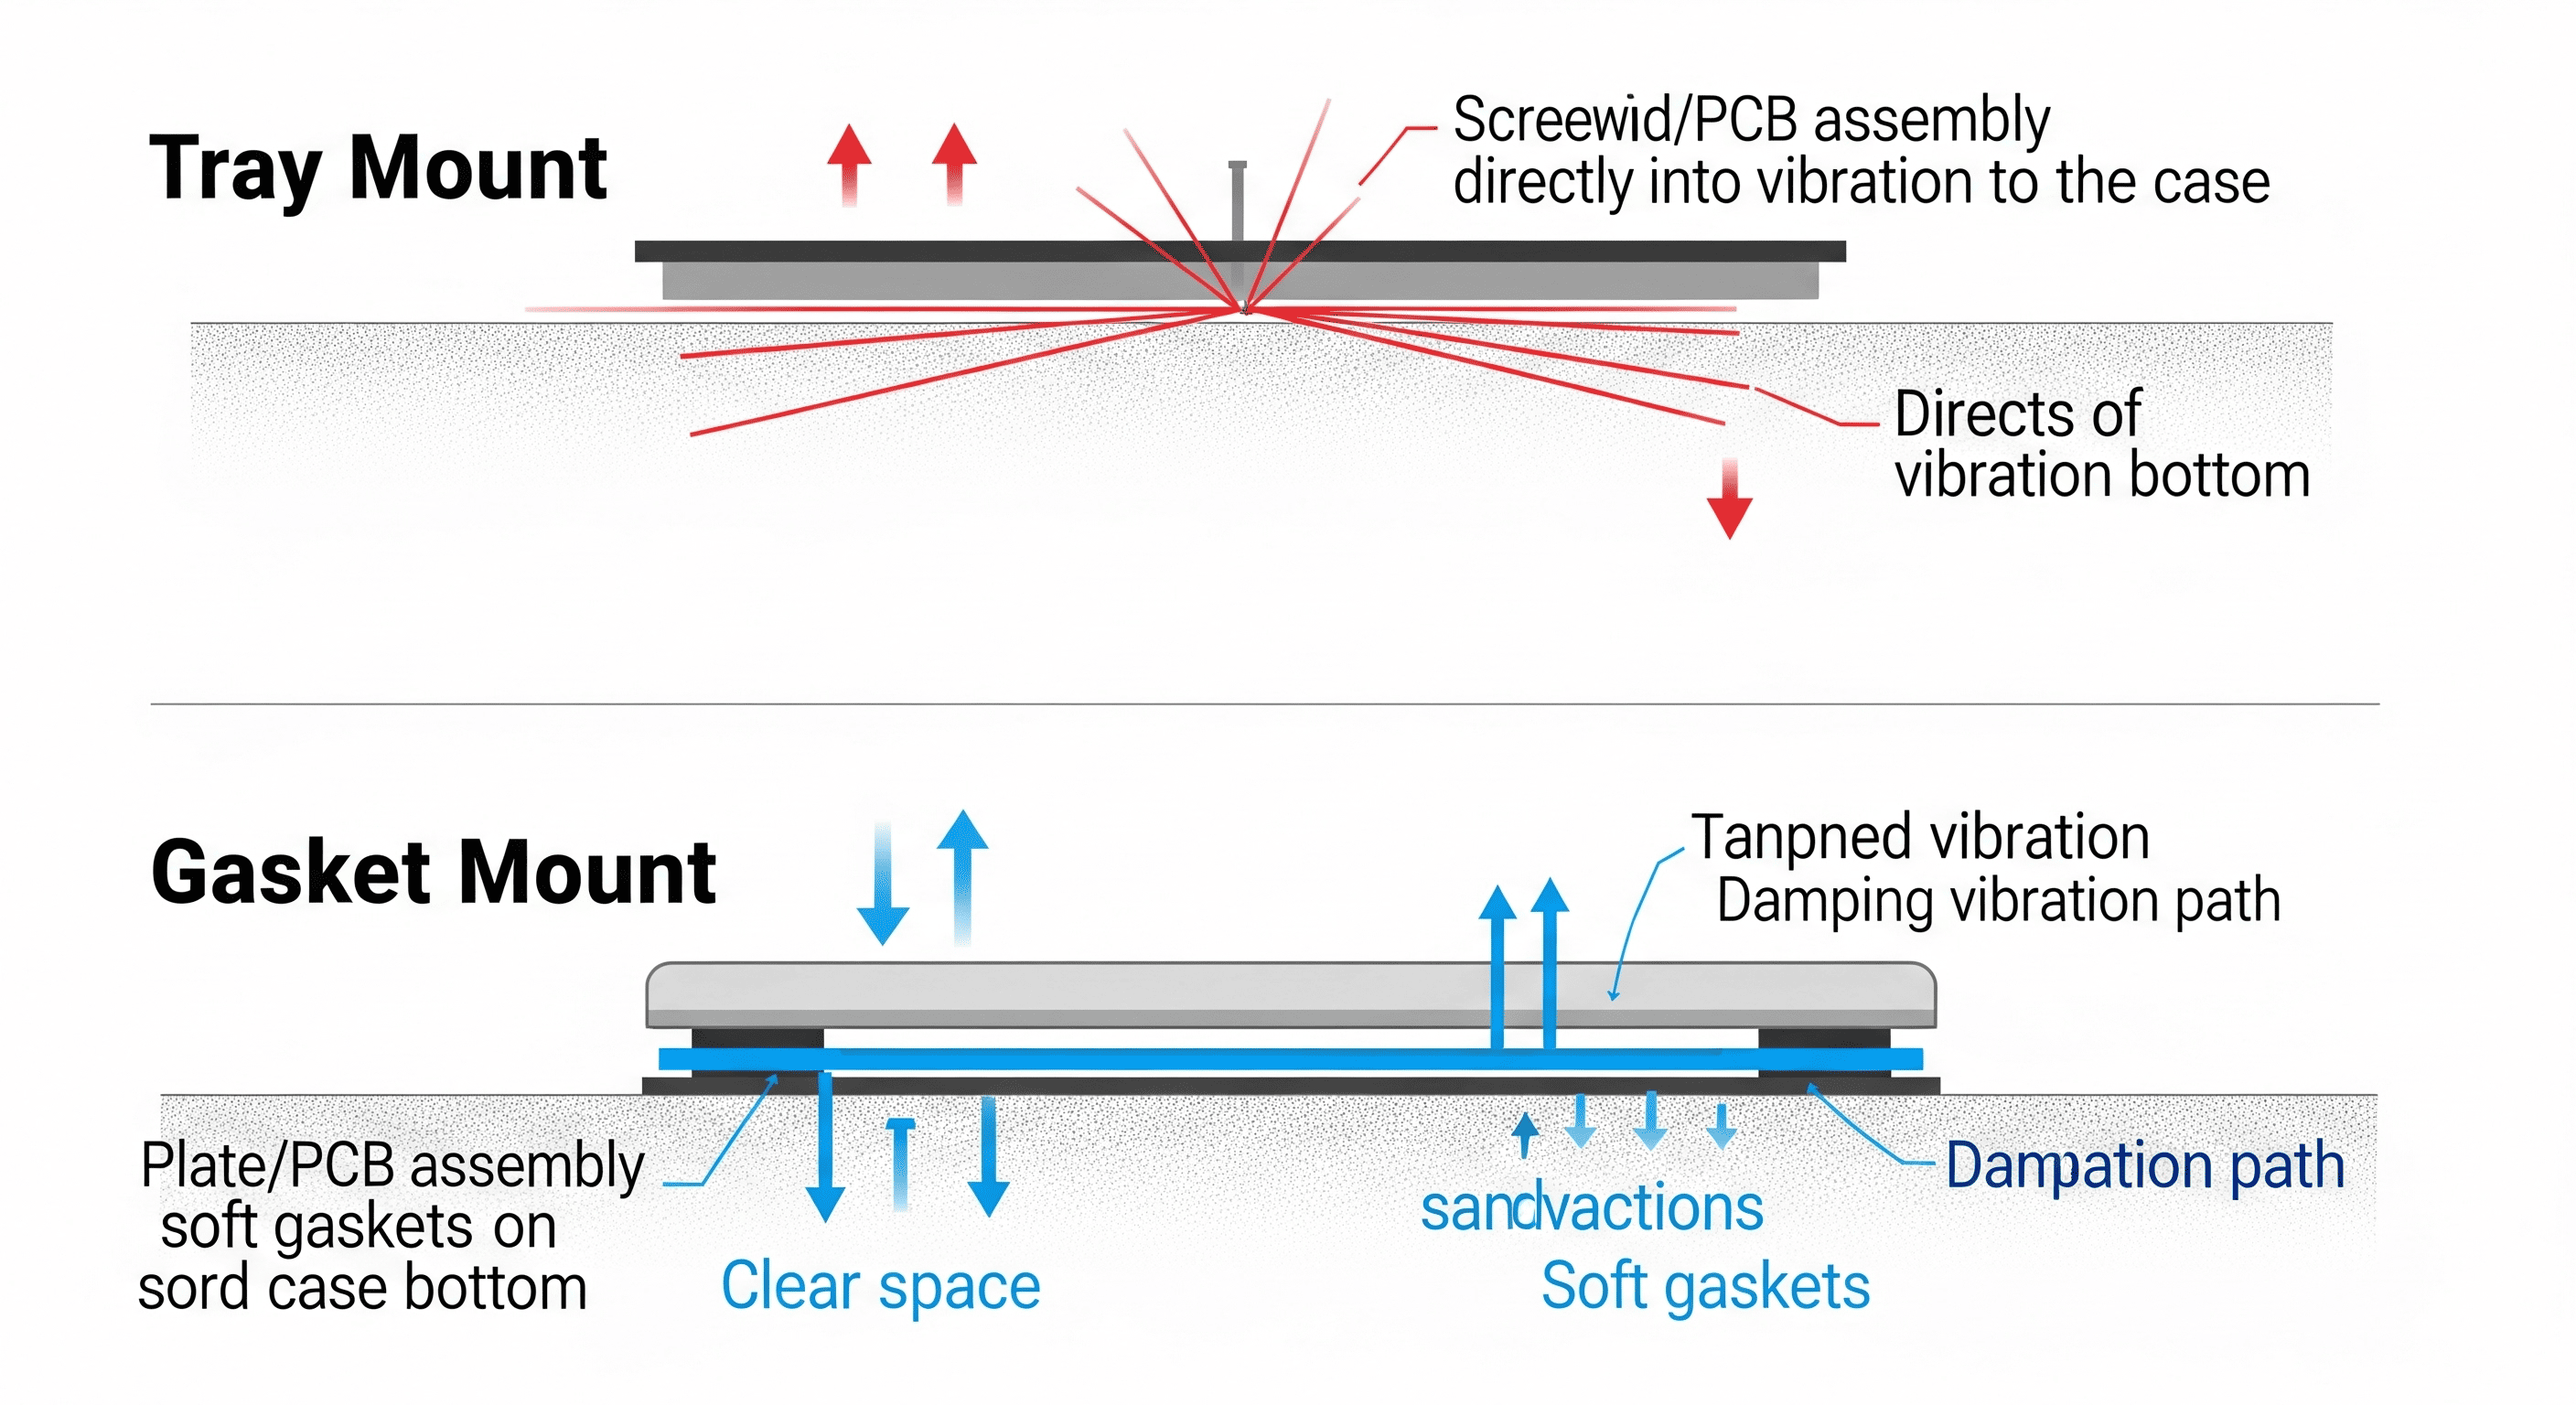
- Mounting Style: The way the plate is mounted to the case is critical. A “tray mount” keyboard, where the PCB is screwed directly into the case, can create harsh vibrations and an inconsistent sound. More premium mounting styles like “gasket mount”—where the plate is isolated by rubber gaskets—are designed to control vibrations and produce a softer, deeper, and more uniform sound.
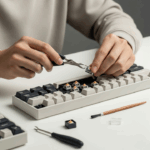
The Modding Workshop: Fine-Tuning Your Sound
This is where the real “customization” magic happens. These simple, often DIY mods can make a night-and-day difference in your keyboard’s acoustics.
- Case Foam Mod: This is the easiest and most effective mod for beginners. Simply add a layer of dense foam (like neoprene or EVA foam) to the bottom of the case. This fills the empty space, absorbs stray vibrations, and eliminates that undesirable hollow echo, instantly making the keyboard sound more solid and premium.
- The “Tempest” Tape Mod: A favorite of the community, this involves applying layers of painter’s tape to the back of the Printed Circuit Board (PCB). This simple trick subtly alters the sound reflections, typically resulting in a deeper, poppier sound signature.
- PE Foam Mod: Not to be confused with case foam, this involves adding a thin layer of polyethylene (PE) foam between the plate and the PCB. This mod dramatically changes the sound, creating a unique “marbly” or “poppy” acoustic that has become extremely popular.
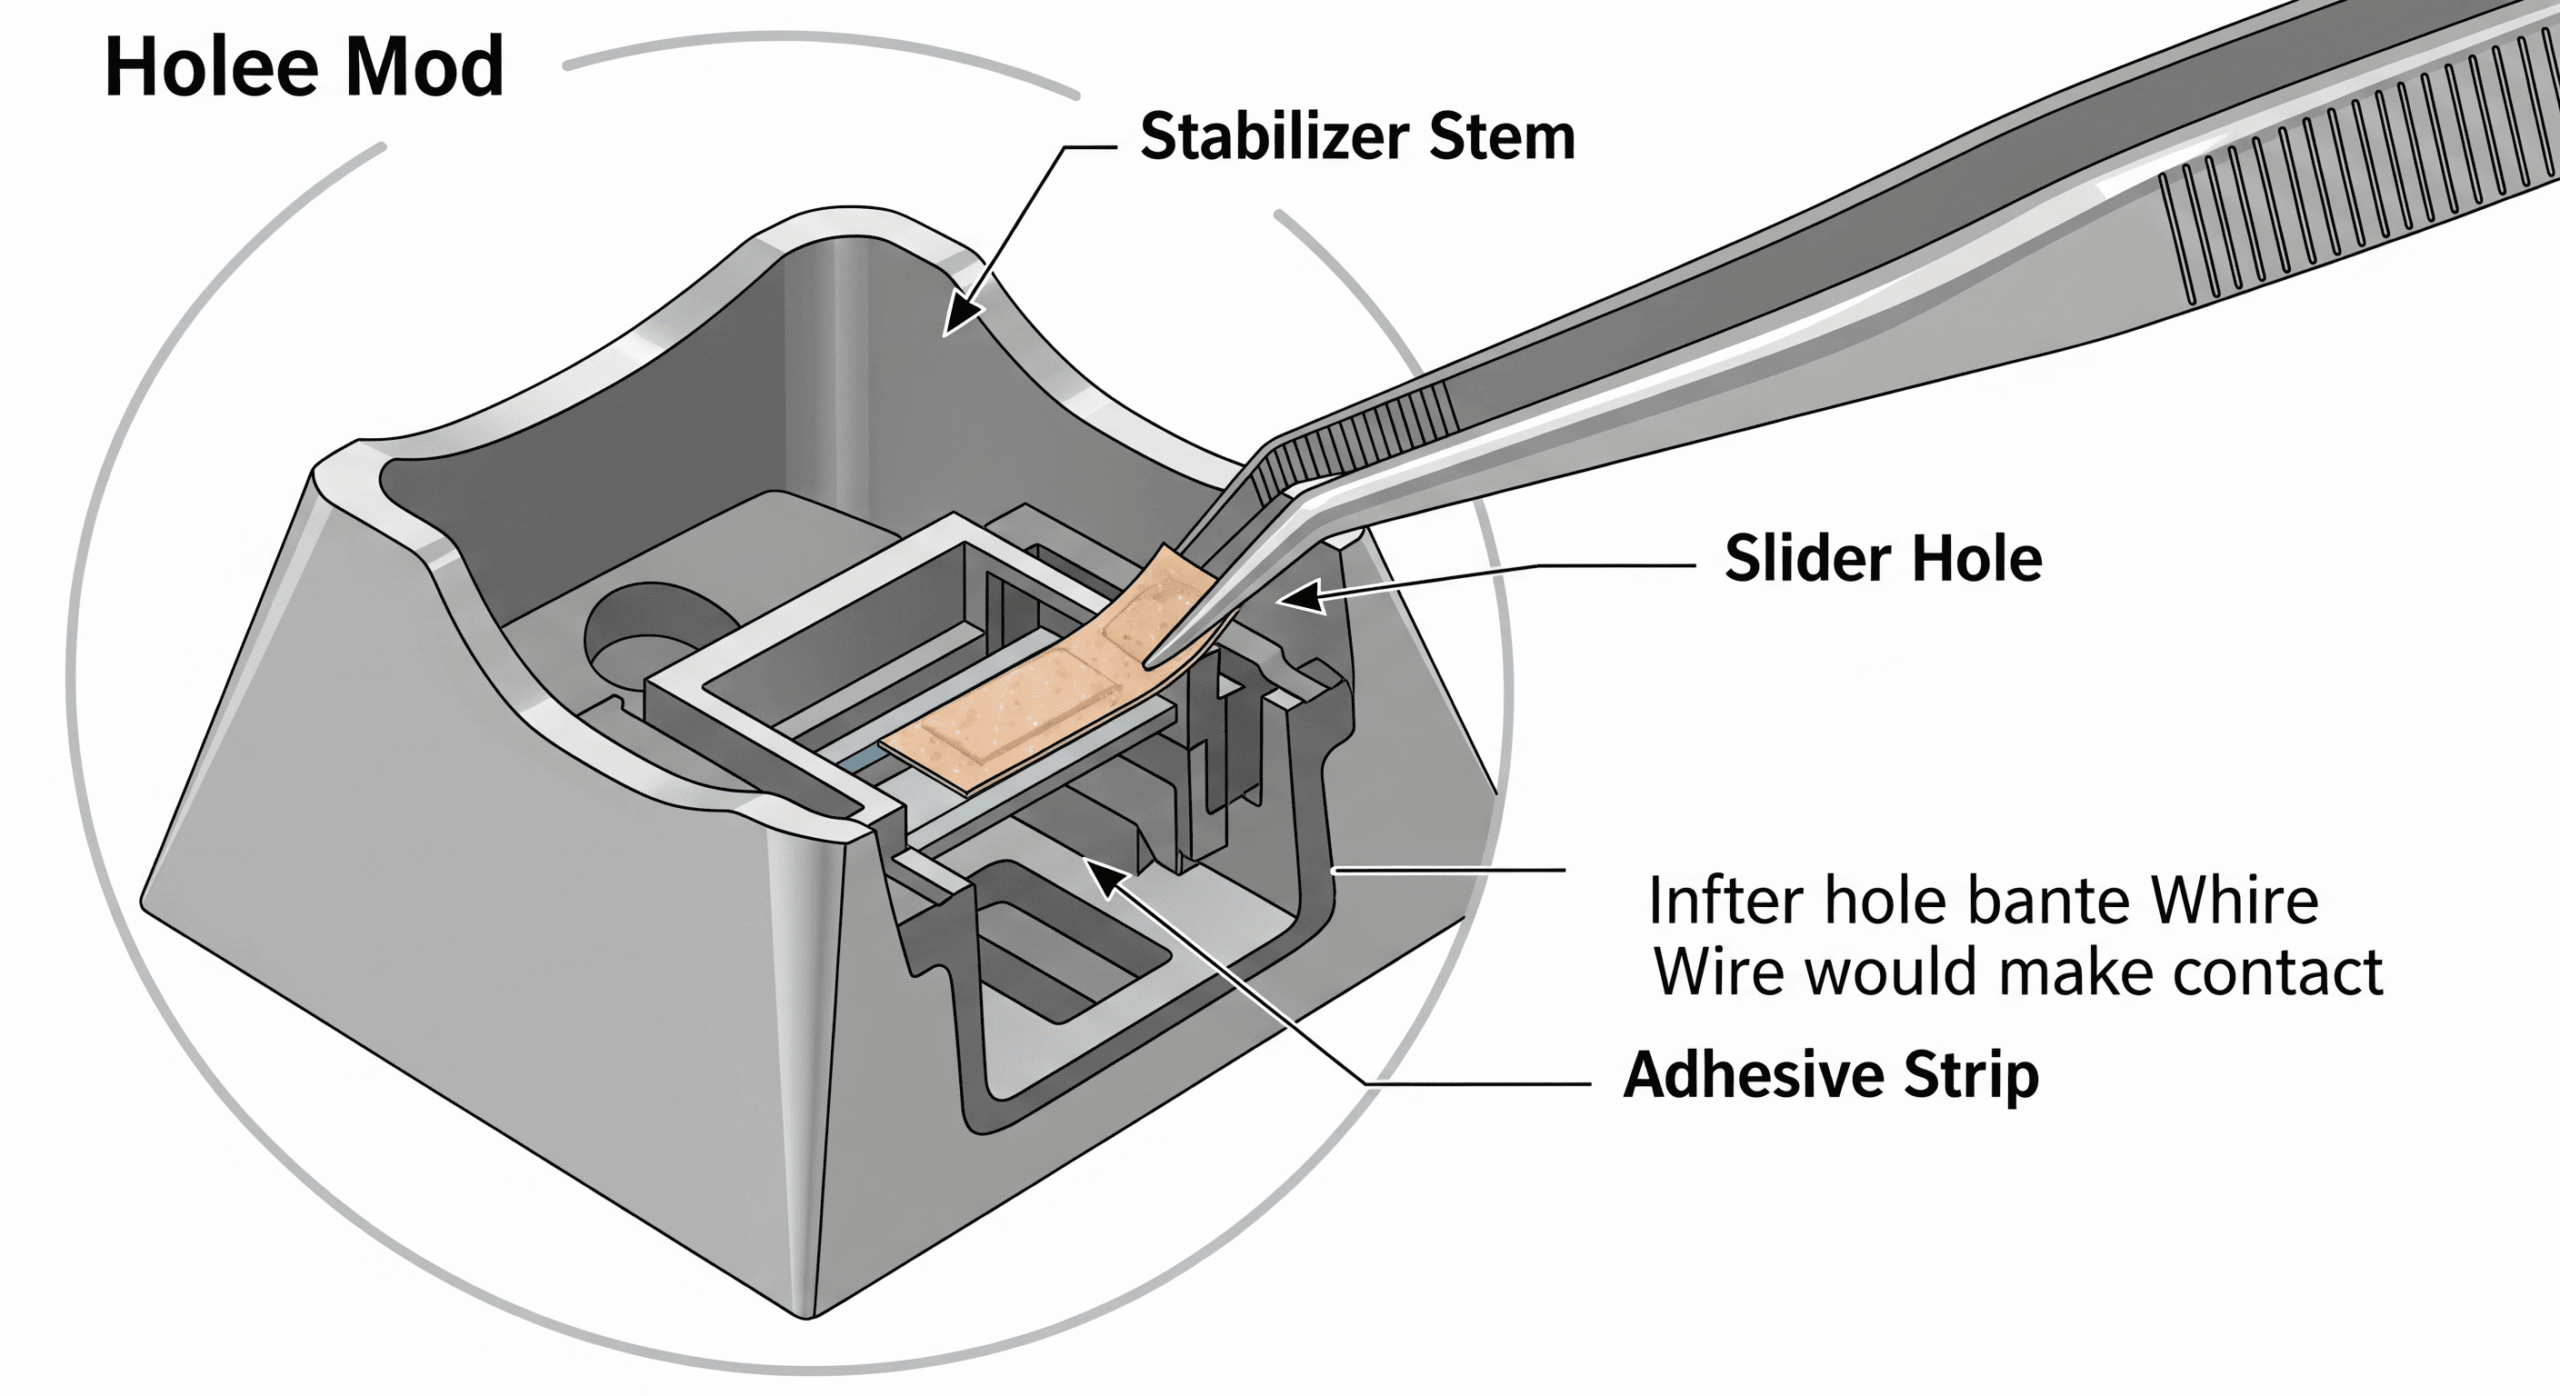
- Ultimate Stabilizer Tuning: The rattle from the spacebar, enter, and shift keys can ruin the sound of an otherwise great keyboard. Properly tuning your stabilizers is essential. This involves:
- Lubricating: Applying a thick dielectric grease or Krytox 205g0 to the wire and inside the stabilizer housing.
- Clipping: Clipping the small “feet” off the bottom of the stabilizer stem (on Cherry-style stabilizers) to prevent a mushy bottom-out.
- The Holee Mod: Placing a small piece of a band-aid or specialized adhesive inside the stabilizer stem housing to eliminate any remaining rattle between the wire and the plastic. A perfectly silent, solid-sounding spacebar is the hallmark of a well-tuned custom keyboard.
Conclusion
A keyboard’s sound is a rich symphony composed by every one of its parts, from the switch lubricant to the case material to the keycap profile. The journey to your perfect sound is a deeply personal and rewarding aspect of the keyboard hobby. There is no objectively “best” sound—only the sound that is most satisfying to you. It’s an iterative process of experimentation and discovery.
Whether you’re on “Team Thock,” “Team Clack,” or “Team Poppy,” understanding how each component contributes allows you to become the conductor of your own desktop orchestra. We encourage you to start with a simple modification, like adding case foam or meticulously tuning your spacebar. You will be amazed at the difference it can make, and from there, a whole world of acoustic customization awaits.