Introduction
Look at almost any standard keyboard, and you’ll find them: two little plastic feet on the bottom that flip out to prop it up. For decades, we’ve been taught to use them, assuming that a tilted keyboard is an ergonomic keyboard. We believe it gives us a better angle to see and reach the keys. But what if this universal habit is not only wrong but actively contributing to the wrist pain we’re trying to avoid?
Meet James, a dedicated office worker who has always meticulously flipped out his keyboard’s feet at the start of each day. He assumed this was the “correct” way to set up his workspace for comfort. Yet, he still ends his days with aching wrists and wonders what he’s doing wrong. The problem isn’t his diligence; it’s that the conventional wisdom about keyboard tilt is flawed. This guide will flip the script on keyboard ergonomics, explaining the science behind keyboard tilt and why a flat—or even negatively-tilted—keyboard is one of the best changes you can make for your long-term wrist health.
Understanding Keyboard Tilt: The Three Positions
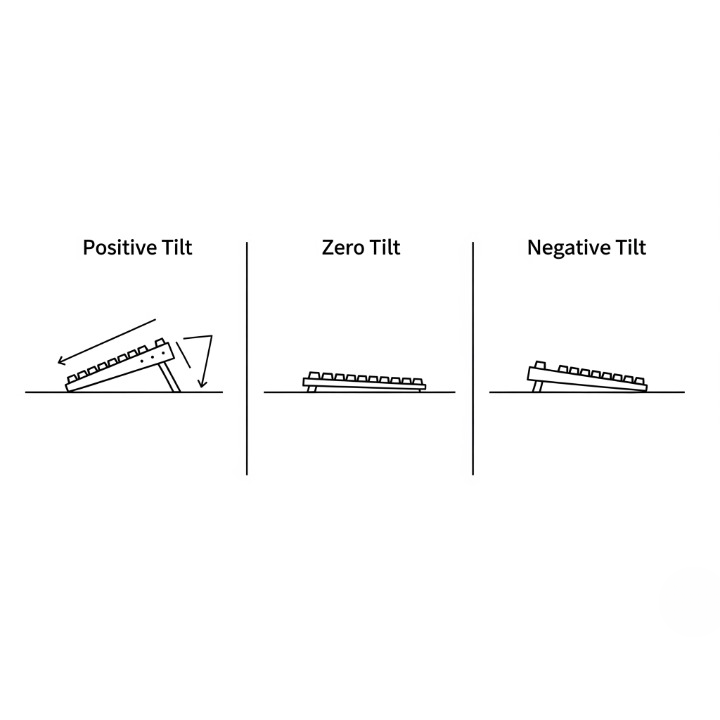
When we talk about “tilt,” we’re referring to the angle of the keyboard relative to your desk surface. There are three main positions, each with a very different impact on your body.
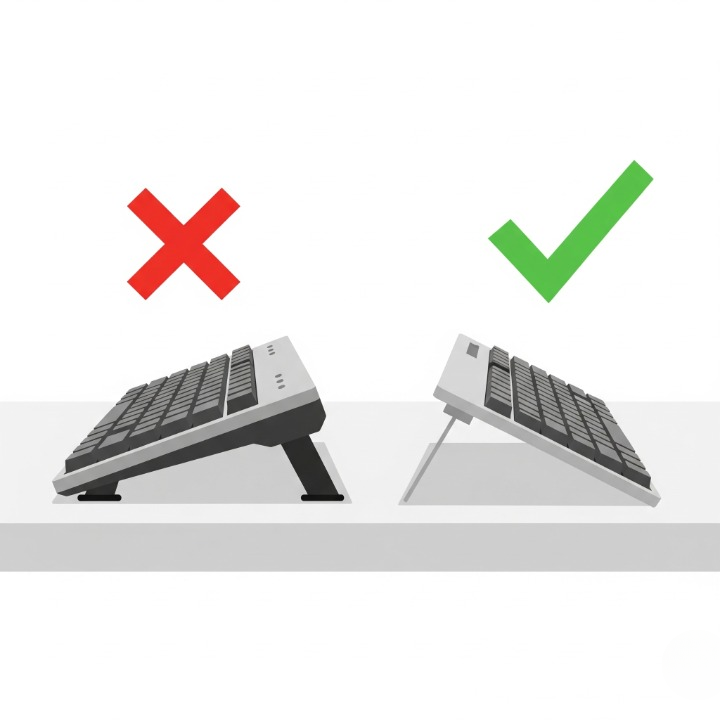
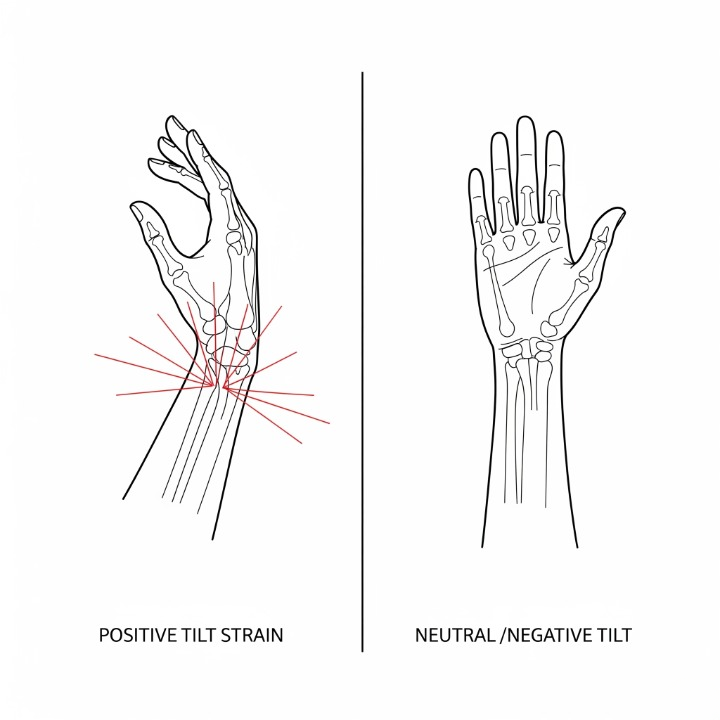
- Positive Tilt: This is what you get when you use the keyboard feet. The back of the keyboard is higher than the front. This is the most common setup, and as we’ll see, it’s also the most problematic.
- Zero Tilt (Flat): The keyboard lies completely flat on the desk, parallel to the surface. This is a significant improvement over a positive tilt.
- Negative Tilt: This is the gold standard for keyboard ergonomics. The front of the keyboard (the edge closest to you) is higher than the back. This allows your hands to slope downwards naturally.
The Science of Wrist Extension: Why Positive Tilt is the Enemy
The core problem with a positive tilt is that it forces your hands into a state of dorsiflexion, more commonly known as wrist extension. This means you have to constantly bend your wrists upwards to reach the keys.
Think of your forearm and hand as a straight line. Any time you bend that line at the wrist, you are putting strain on the delicate structures within. When you bend your wrists upwards:
- You compress the carpal tunnel: This narrow passageway in your wrist contains the median nerve. Constant compression can lead to pain, numbness, and tingling—the classic symptoms of Carpal Tunnel Syndrome.
- You strain your extensor tendons: The tendons that run along the top of your forearm have to work harder, held in a constantly tensed position. This leads to fatigue and can cause tendonitis.
A flat keyboard reduces this strain, but a negative tilt eliminates it almost entirely, allowing your wrists to maintain their most natural, straight alignment with your forearms. This is a core principle we cover in our guide to healthy typing habits and exercises.
How to Achieve a Neutral or Negative Tilt
So, if flipping up the feet is wrong, how do you achieve a better position?
- Close the Feet: The easiest first step is to simply close the feet on your keyboard and use it flat on your desk. For many people, this alone will provide noticeable relief.
- Use an Adjustable Keyboard Tray: This is the classic corporate ergonomics solution. A good articulating keyboard tray installed under your desk allows you to adjust both the height and the tilt angle, making it easy to achieve a negative tilt. Brands like Humanscale are famous for these systems.
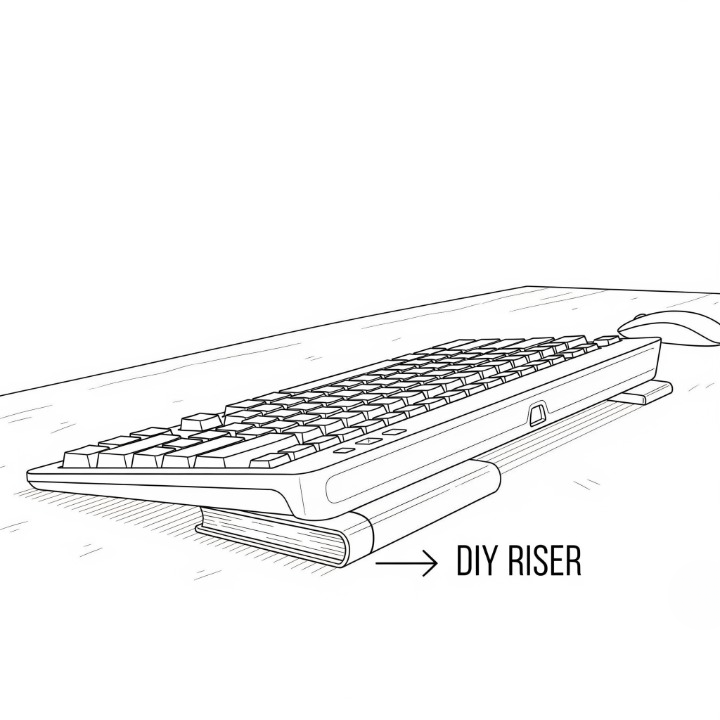
- DIY Negative Tilt: You don’t need expensive equipment. You can create a negative tilt by propping up the front edge of your keyboard. A thin book, a small rolled-up towel, or a purpose-built foam wedge placed under the part of the keyboard closest to you can achieve the desired angle.
- Invest in an Ergonomic Keyboard: Many advanced ergonomic keyboard designs, especially split and contoured models, have built-in tenting and tilting mechanisms that allow for true negative tilt. The Kinesis Advantage360 is a prime example of a keyboard designed around this principle.
Comparing Tilt Angles and Their Impact
This table summarizes the key differences and helps you understand the impact of each position.
Conclusion
It’s time to unlearn a bad habit that has been built into keyboard design for decades. For James, our office worker, the simple act of closing his keyboard’s feet and letting it lie flat made a world of difference. After a week, his daily wrist pain had subsided significantly. The little plastic feet on your keyboard are not there for ergonomics; they are a legacy feature from a time when people needed to see the keys to type. For a modern touch-typist, they are a liability.
We challenge you to try an experiment. For one week, close your keyboard’s feet and work with it flat. If you’re feeling adventurous, find a way to prop up the front edge to create a slight negative tilt. It might feel strange for the first day or two as your muscles adapt, but you may be surprised at how much more comfortable your wrists feel. It’s a simple, free, and scientifically-backed change that can have a profound impact on your daily comfort and long-term health.