Introduction
Take a moment to look down at your keyboard. Be honest. What do you see between the keys? Last week’s lunch crumbs, dust bunnies that have taken up residence, maybe a bit of coffee splatter from a Monday morning mishap? We use our keyboards for hours every single day, yet they are often the most neglected piece of technology on our desks. A dirty keyboard isn’t just unsightly; it’s a breeding ground for germs and can lead to sticky, unresponsive keys, reduced performance, and a generally unpleasant typing experience that subtly hinders your productivity.
But what if you could not only restore your keyboard to its former glory but also make it uniquely yours? This is where the joy of keyboard maintenance and customization begins. It’s about transforming a generic tool into a personalized extension of your desk setup. Meet Leo, a student who was ready to toss out his grimy, unresponsive keyboard. Instead, he decided to give it one last chance with a deep clean. Not only did he bring it back to life, but he also discovered the simple pleasure of swapping the keycaps for a set that matched his style. This detailed guide will walk you through that same satisfying process, giving your keyboard a well-deserved “spa day” that will leave it looking, feeling, and performing better than ever.
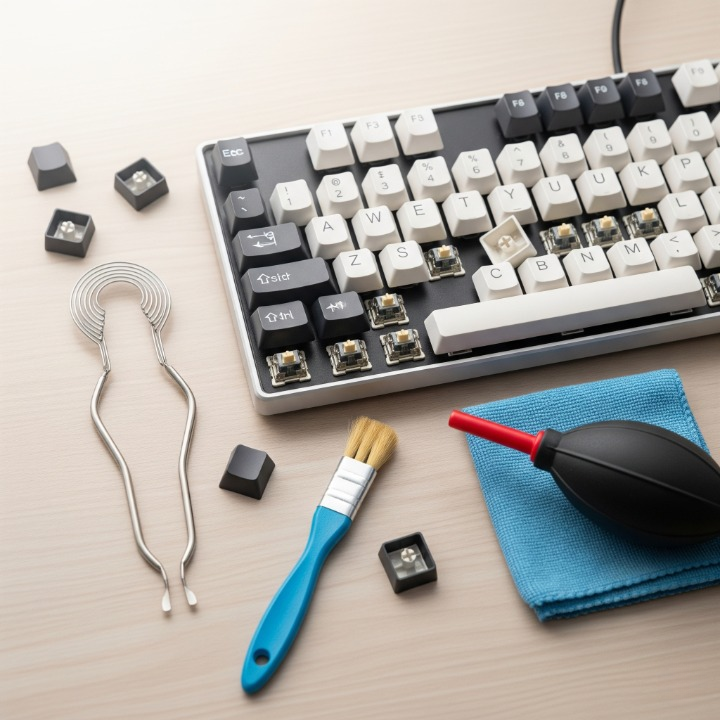
The Essential Toolkit: Gearing Up for Your Keyboard Spa Day
Before you begin, gathering a few simple tools will make the process much smoother and safer for your keyboard. You don’t need a professional workshop; most of these items are likely already in your home or are inexpensive to acquire. Having everything ready means you won’t be scrambling for a cotton swab mid-clean, with keycaps scattered across your desk.
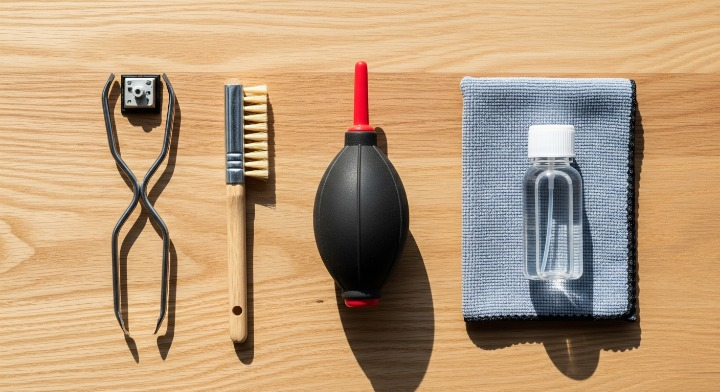
Here is a quick checklist of your essential keyboard cleaning and maintenance toolkit.
Step-by-Step Cleaning Guide: From Quick Dusting to a Full Deep Clean
The level of cleaning your keyboard needs will depend on its condition and type. We’ll cover everything from a quick refresh to a full deep clean, with important precautions to keep your hardware safe.
Important Precautions: What to Avoid
- Never submerge the keyboard body. The electronic circuit board (PCB) underneath will be permanently damaged by water.
- Avoid harsh cleaning chemicals. Bleach, ammonia, or abrasive cleaners can damage the plastic and ruin the legends on your keycaps.
- Don’t put keycaps in the dishwasher. The high heat can warp the plastic, causing them to no longer fit on your keyboard switches properly.
Step 1: Unplug and Document
Safety first! Always disconnect your keyboard from the computer before you start cleaning. Now, take a clear “before” photo with your phone. This isn’t just for a satisfying comparison later; it’s your essential reference map for putting all the keys back in the right place, especially modifiers like Ctrl, Alt, and Shift.
Step 2: The Quick Refresh (Weekly Maintenance)
This is a 5-minute routine to keep the grime at bay. Turn the keyboard upside down and give it a few gentle shakes. Use your compressed air or air blower to blast out any loose debris from between the keys. Finally, take your microfiber cloth, lightly dampened with a little water or isopropyl alcohol, and wipe down the keycap surfaces and the keyboard’s outer case.
Step 3: The Full Deep Clean (Quarterly Maintenance)
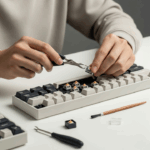
This is the full spa treatment. Using your wire keycap puller, hook the wires under opposite corners of a keycap and pull straight up gently. You’ll feel a small pop as it detaches from the switch. Repeat for all keys, placing them in a bowl as you go.
With the keycaps removed, you’ll see the keyboard’s main plate. Use your air blower and soft brush to thoroughly sweep away all the dust and debris from around the switches. For any stuck-on grime on the plate, use a cotton swab lightly dipped in isopropyl alcohol.
For the keycaps themselves, fill a bowl with warm (not hot) water and a few drops of gentle dish soap. Let the keycaps soak for an hour or two. Afterward, use a soft cloth or brush to wipe away any remaining residue, then rinse them thoroughly under cool water. Lay them out stem-side-down on a towel to air dry completely. This is the most critical part: they must be 100% dry inside and out before reinstallation. This can take 24 hours, so be patient.
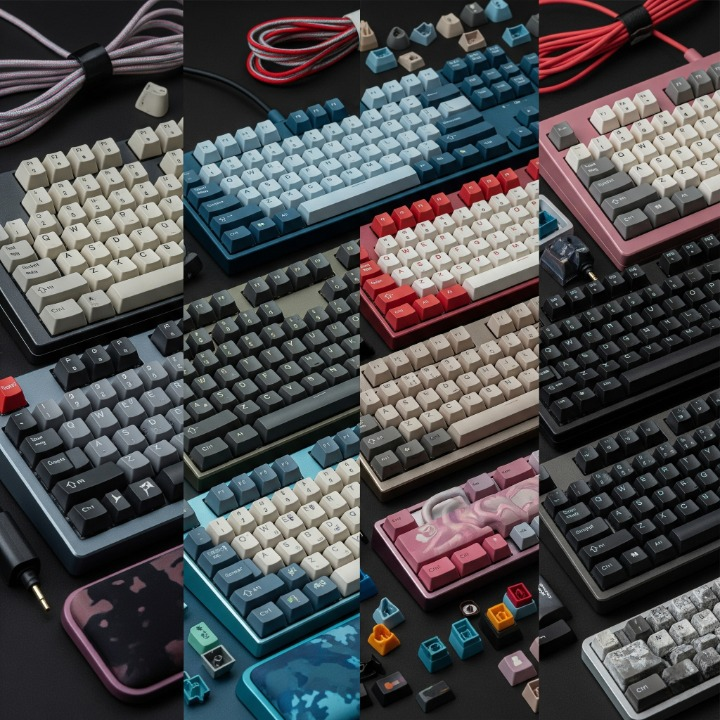
Your First Customization: The Deep World of Keycaps
With your keyboard sparkling clean, you’re at the perfect starting point for customization. Swapping your keycaps is the easiest and most visually impactful way to personalize your keyboard. It’s a deep rabbit hole, but we’ll cover the basics you need to know.
Keycap Materials: ABS vs. PBT
- ABS (Acrylonitrile Butadiene Styrene): This is the most common plastic for stock keycaps. It’s smooth, lightweight, and allows for vibrant colors. Its main downside is that it wears down over time, developing a “shine” on frequently used keys.
- PBT (Polybutylene Terephthalate): Often considered an upgrade, PBT is a harder, more durable plastic. It has a slightly sandy or matte texture that resists the shine that plagues ABS. The sound of PBT keycaps is often described as deeper or “thockier” than the higher-pitched sound of ABS.
Understanding Keycap Legends (The Letters and Symbols)
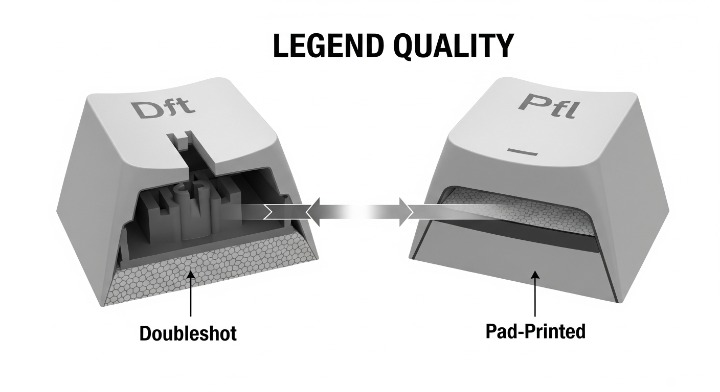
The method used to print the letters on your keycaps determines how long they will last.
- Doubleshot: This is the gold standard. Two separate pieces of plastic are molded together to create the keycap. The legend is physically part of the keycap, so it will never fade or wear away.
- Dye-Sublimation (Dye-sub): A process where heat is used to infuse dye into the plastic itself. This is also extremely durable and allows for complex, multi-colored designs. It works best on light-colored PBT keycaps.
- Pad-Printed / Laser-Etched: These are surface-level printing methods common on cheaper keyboards. The legend is printed or etched on top of the plastic and will eventually wear off with use.
Keycap Profiles: Shaping Your Typing Feel
The shape, height, and sculpt of your keycaps are called their “profile.” This significantly affects the typing experience.
- OEM/Cherry Profile: These are the most common. They are sculpted, meaning each row has a different height and angle to create a comfortable, curved surface for your fingers. Cherry profile is slightly lower than OEM.
- SA Profile: A tall, spherical, and heavily sculpted profile that provides a retro, typewriter-like feel and sound.
- XDA/DSA Profile: These are “uniform” profiles, meaning every keycap has the same height and spherical shape. Some people love the consistent, clean look, while others miss the sculpted feel. Choosing a profile that feels good to you is a final, important touch for your overall ergonomic workspace setup.
Putting It All Back Together: The Final Step
Once your keycaps are bone-dry, it’s time for the satisfying finale. Using your “before” photo as a guide, press each keycap firmly back onto its corresponding switch. For larger keys like the spacebar, Shift, and Enter, make sure the stabilizer stems align with the stabilizer housing on the keyboard before you press down.
Plug your keyboard back in. Open a text editor and test every single key. Revel in the crisp feel and clean look of your newly serviced board. Now that your physical interface feels brand new, you can further enhance your efficiency by mastering powerful keyboard shortcuts.
Conclusion
Your keyboard is your primary connection to your digital life. Treating it to a regular “spa day” is about more than just aesthetics and hygiene; it’s about respecting your tools, ensuring their longevity, and making your daily work more enjoyable. The process of disassembling, cleaning, and personalizing your keyboard creates a much stronger sense of ownership and can transform a generic office tool into a piece of personalized tech that you genuinely love to use and display.
So, schedule a time this weekend. Gather your tools, put on some music, and give your keyboard the care it deserves. Whether you’re simply restoring it to its showroom shine or embarking on your first exciting keycap adventure, you’ll be rewarded with a typing experience that is cleaner, smoother, more reliable, and uniquely, undeniably your own.