Introduction
You’ve done it. You’ve curated the perfect desk setup. Your chair is supportive, your monitor is at the ideal height, and you’re typing on a fantastic keyboard that you love. You’ve followed our guides on creating a holistic ergonomic workspace and even picked out the perfect hardware. So why do you still have that nagging pain in your right shoulder or a familiar ache in your wrist at the end of the day?
Meet Ana, a data analyst who recently upgraded to a split ergonomic keyboard but still felt strain in her mouse hand and shoulder. She realized the problem wasn’t her keyboard; it was the vast, empty space between her keyboard and her standard mouse. The constant reaching and the unnatural grip were undoing all her hard work. Your mouse isn’t just an accessory; it’s your keyboard’s essential partner in the ecosystem of comfort. This guide will explore why your mouse choice is critical for your entire setup and introduce you to the world of ergonomic mice.
Why Your Standard Mouse is a Problem
For a keyboard user, a standard mouse creates three major ergonomic problems, especially when paired with a full-size keyboard with a number pad.
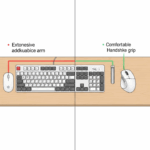
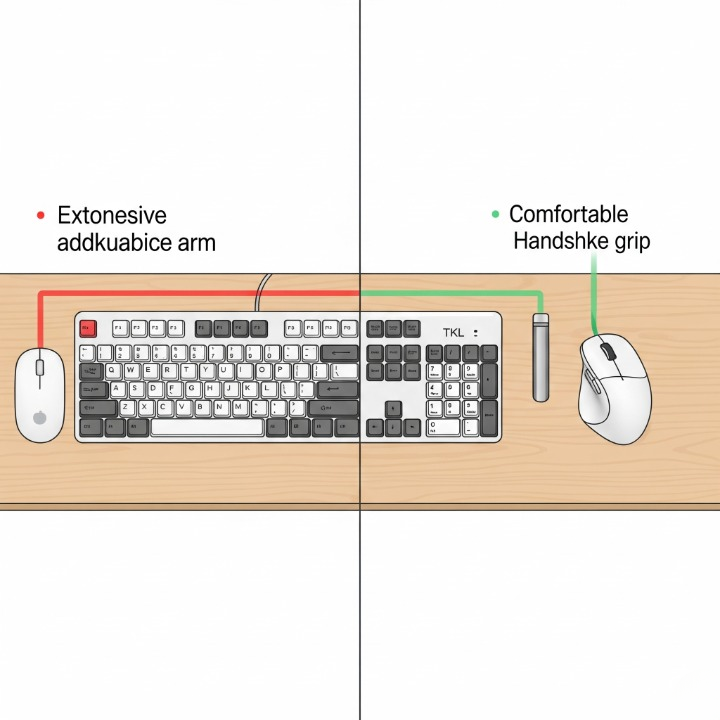
- Shoulder Abduction (The Outward Reach): A full-size keyboard is wide. To use a mouse to its right, you must constantly reach outwards, forcing your arm away from its natural, relaxed resting position. This sustained outward position, known as shoulder abduction, puts significant strain on your deltoid and rotator cuff muscles. Over a full workday, this static tension leads to deep aches, knots between your shoulder blades, and can even contribute to neck pain.
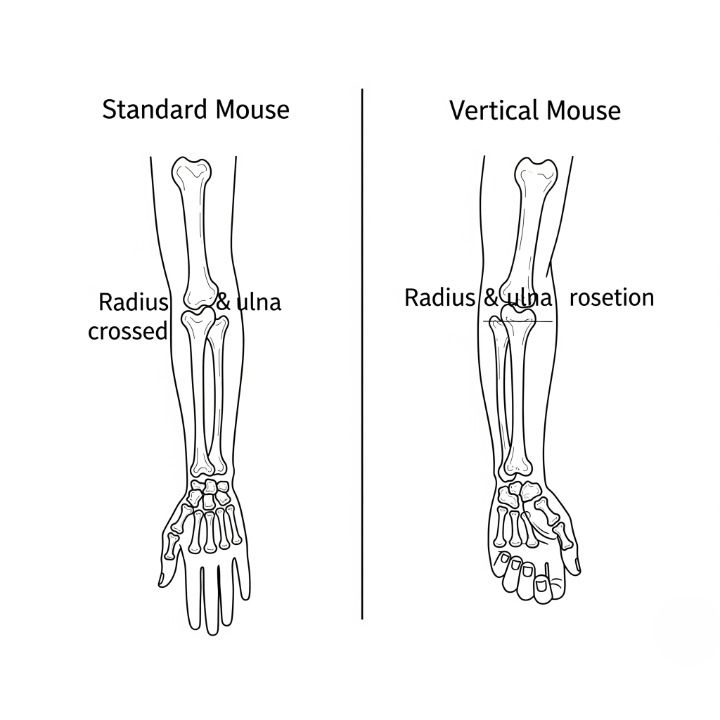
- Forearm Pronation (The Wrist Twist): A standard, flat mouse forces your hand into a palm-down position. To achieve this, your forearm bones—the radius and ulna—must cross over each other. Holding this twisted “pronation” for hours tenses the muscles in your forearm. This, combined with the constant small movements of the wrist, creates a perfect storm for Repetitive Strain Injuries (RSI), a topic well-documented by health resources like Healthline.
- Grip Tension: The generic shape of many standard mice encourages a tense “death grip.” You may find yourself constantly pinching the mouse to maintain control, leading to fatigue and strain in your fingers and thumb.
Types of Ergonomic Mice: Finding Your Fit
Ergonomic mice come in a few key designs, each tackling these problems in a different way.
Vertical Mice: The “Handshake” Grip
A vertical mouse is the most direct solution to forearm pronation. It’s essentially a standard mouse turned on its side, allowing you to hold it in a neutral “handshake” grip. This simple change keeps your forearm bones parallel and in their most relaxed state, providing immediate relief for many users with wrist pain.
- Best for: Users experiencing wrist or forearm pain from pronation.
- Learning Curve: Low. It feels surprisingly natural after an hour or two of adjustment.
- Popular Example: The Logitech MX Vertical is widely considered the gold standard for its comfortable 57-degree angle and premium build.
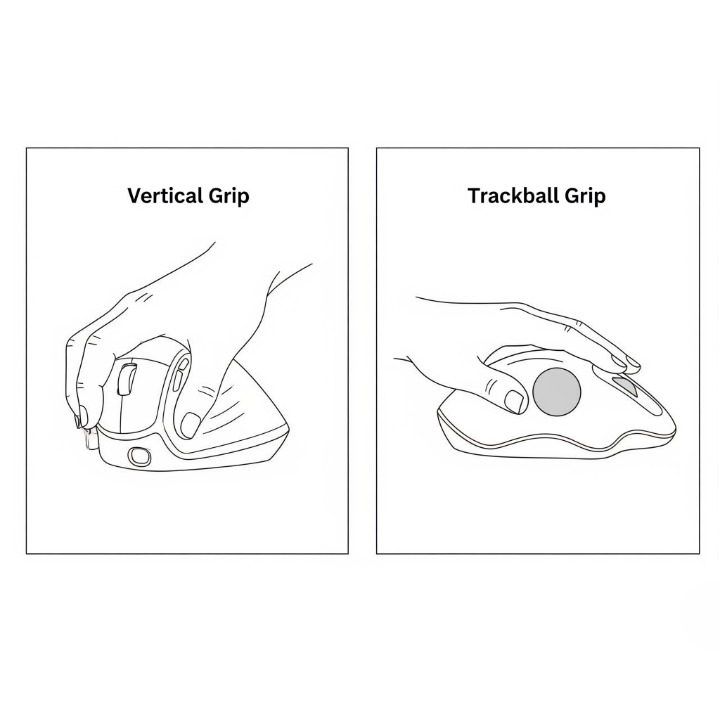
Trackball Mice: Let Your Fingers Do the Moving
With a trackball mouse, the device itself stays stationary. You move the cursor by rolling a ball with your thumb or fingers, which completely eliminates the need for arm and shoulder movement to control the pointer.
- Best for: Users with shoulder pain, limited desk space, or those who need pixel-perfect precision.
- Learning Curve: Medium. It takes a few days to retrain your brain to aim with just your digits.
- Key Variations:
- Thumb-Operated: You move the ball with your thumb and click with your fingers. The Logitech MX Ergo is a top choice here.
- Finger-Operated: You move a much larger ball with your index and middle fingers and click with your thumb and pinky. The Kensington Expert Mouse is a classic in this category.
The Keyboard and Mouse Synergy
Your keyboard layout has a massive impact on your mouse ergonomics. The single best thing you can do to reduce the “keyboard-to-mouse gap” is to use a more compact keyboard.
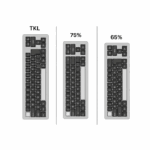
- Compact Layouts are Key: By switching from a full-size board to a Tenkeyless (TKL) or 75% layout, you reclaim several inches of desk space. This allows you to bring your mouse closer to the center of your body, creating a more natural and comfortable arm position. We explore the differences in our Keychron Q Series layout guide.
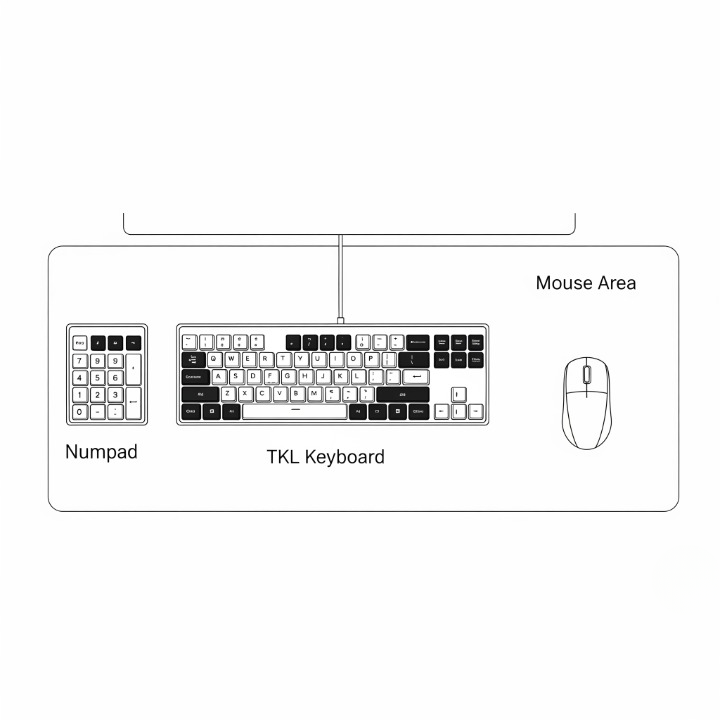
- The Southpaw Solution: For number pad power users, a great ergonomic hack is to get a TKL keyboard and a separate, standalone number pad. You can then place the number pad to the left of your keyboard. This keeps your number entry functionality while freeing up the entire right side for your mouse—the best of both worlds.
Making the Transition: What to Expect
Switching to a radically different mouse shape requires a period of adjustment. Don’t get discouraged if you feel clumsy at first.
- The Brain-Rewiring Period: Expect an initial drop in speed and accuracy. Your brain has years of muscle memory tied to a standard mouse. It can take anywhere from a few days to a week of consistent use to feel proficient with a vertical mouse or trackball.
- Fine-Tune Your Settings: Spend time in your computer’s system settings to adjust the pointer speed and acceleration. A trackball often requires a higher pointer speed than a traditional mouse to feel comfortable.
- Listen to Your Body: If possible, ease into it. Use the new mouse for an hour on the first day, two hours on the second, and gradually increase. This gives your muscles time to adapt to the new movements. The principles are similar to those in our guide to healthy typing habits.
Key Features to Consider
When choosing an ergonomic mouse, keep these factors in mind.
Conclusion
Your keyboard and mouse are a team. Optimizing one without considering the other is an incomplete solution. For Ana, our analyst, switching to a compact TKL keyboard and a vertical mouse was the final piece of her ergonomic puzzle. The combination allowed her to keep both of her arms in a comfortable, neutral position throughout the day, finally eliminating her persistent shoulder strain.
Take a look at your desk right now. How far does your hand have to travel to get from the J key to your mouse? How twisted is your wrist when you’re Browse? Answering these questions is the first step. By choosing a mouse that complements your keyboard and supports your body’s natural posture, you can create a truly holistic ergonomic system that promotes comfort, health, and productivity for years to come.