Introduction
You’ve done everything right. You adjusted your chair to the perfect height, your monitor is at eye level, and your elbows are at a neat 90-degree angle. You even followed a guide to create a proper ergonomic workspace setup. Yet, after a long day of typing, you still feel that familiar, nagging strain in your wrists and forearms. What gives? For many, the final piece of the ergonomic puzzle isn’t the environment; it’s the keyboard itself.
Meet Isabella, a writer who diligently optimized her desk setup but couldn’t shake the discomfort. She noticed that to keep her fingers on the home row of her traditional keyboard, her wrists had to bend outwards at an unnatural angle. This realization was her first step into the world of ergonomic keyboards—specialized hardware designed to work with the natural position of the human body, not against it. This guide will introduce you to the main types of ergonomic keyboards, explaining the problems they solve and helping you understand which design might be the right next step for your comfort and health.
Why a Standard Keyboard Can Be a Problem
The flat, rectangular keyboard we all use is a masterpiece of manufacturing efficiency, but it’s not a great fit for human hands. It forces our bodies into two fundamentally unnatural positions for prolonged periods, leading to repetitive strain.
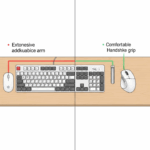
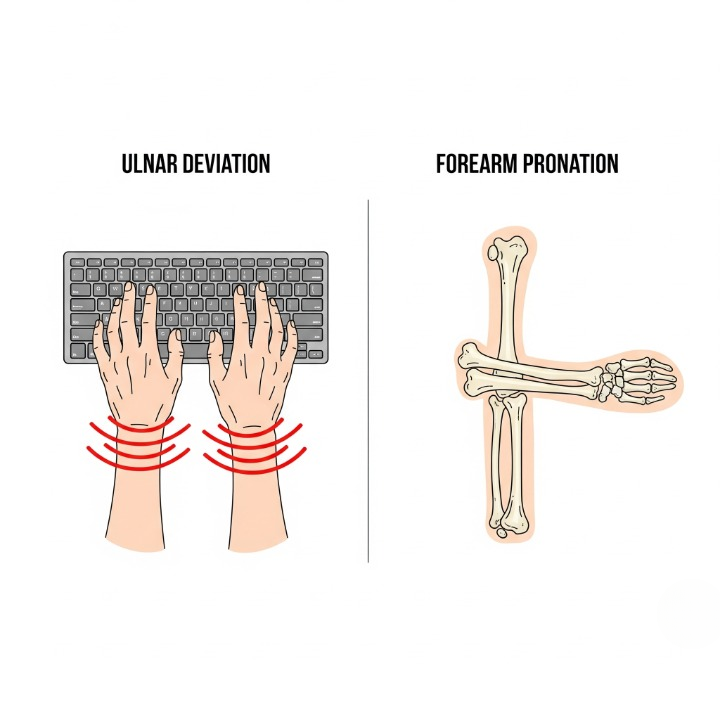
- Ulnar Deviation (Wrist Angling): Look at your hands as you place them on a standard keyboard. Your forearms come in towards the center, but then your wrists must bend outwards to align your fingers with the straight rows of keys. This outward angling is called ulnar deviation. Holding this position puts constant tension on the tendons and nerves that pass through the outside of your wrist, potentially compressing the ulnar nerve and leading to pain and numbness.
- Forearm Pronation (Palm-Down Position): A flat keyboard requires you to type with your palms facing completely down. To achieve this, your two forearm bones—the radius and ulna—must cross over each other. Maintaining this twisted “pronation” for hours on end tenses the muscles in your forearms and can contribute to pain that radiates up into the elbow and shoulder, often associated with conditions like carpal tunnel syndrome.
Ergonomic keyboards are specifically engineered to mitigate or completely eliminate these two biomechanical stressors.
Split Keyboards: Your First Step to Freedom
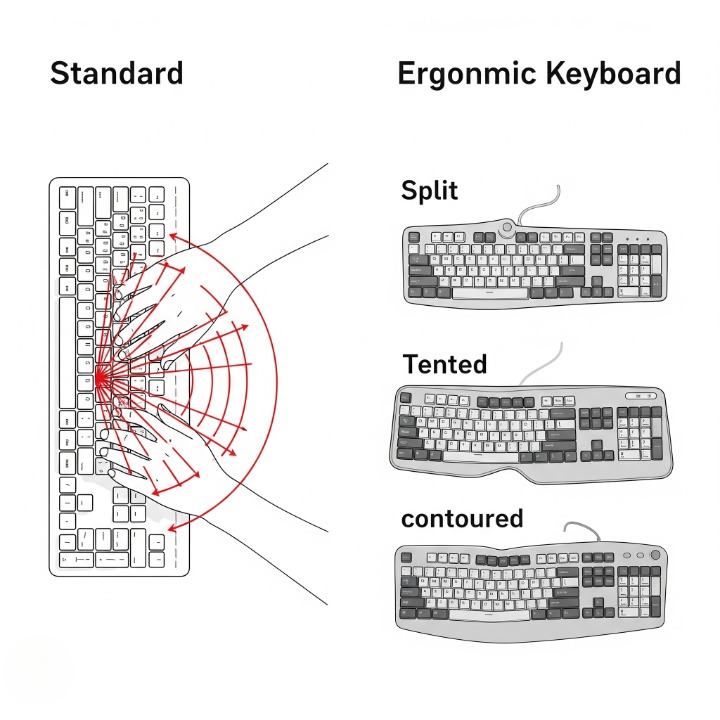
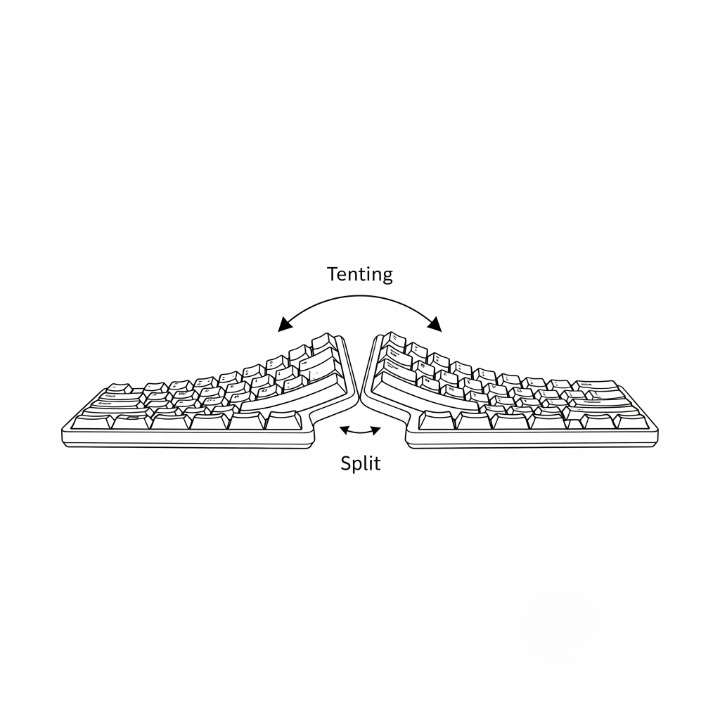
The most common and intuitive type of ergonomic keyboard is the split keyboard. The concept is simple: the keyboard is physically separated into two halves, one for each hand. This design is the most direct solution to ulnar deviation.
By separating the two modules, you can position them on your desk at shoulder width. This allows your arms to approach the keyboard in a straight line from your elbows to your fingertips, completely eliminating the outward wrist bend. This single change brings immediate relief to a huge number of users.
There are two main types of splits:
- Fixed Split: Keyboards like the Microsoft Sculpt have the halves separated but fixed in a single shell, offering a gentle ergonomic curve without setup.
- True Split: Keyboards like the Kinesis Freestyle2 are two independent modules connected by a cable. This offers maximum flexibility, allowing you to find the perfect angle and distance, and even place a trackball or notebook between the halves.
Tented Keyboards: Fighting Forearm Pronation
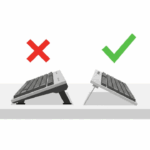
Once your wrists are straight, the next ergonomic frontier is to address the twisting of your forearms. This is where tenting comes into play. Tenting means raising the inner edges of the two keyboard halves, creating an angle that resembles a tent.
This simple upward tilt allows your forearms and hands to rotate into a more neutral “handshake” position, uncrossing the radius and ulna bones. This reduces the constant muscular tension required to keep your palms flat. The degree of tenting is highly personal. Some users prefer a gentle 5-10 degree slope, while others find maximum comfort in nearly vertical setups. Many advanced split keyboards, such as the popular ZSA Moonlander, have robust, built-in tenting mechanisms that are fully adjustable, letting you experiment to find the perfect angle for your body.
Ortholinear & Columnar Layouts: Rethinking Key Arrangement
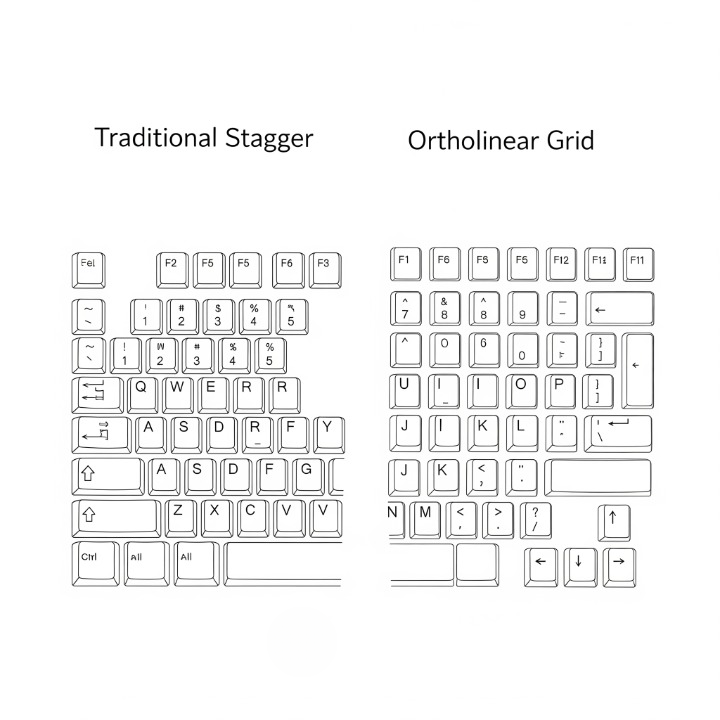
Have you ever wondered why the keys on your keyboard aren’t in a simple grid? The familiar staggered layout is a 150-year-old relic from mechanical typewriters, designed to prevent the physical levers from jamming into each other. For our modern digital devices, this design is no longer necessary and can force awkward, inefficient finger movements.
Ortholinear: The Grid System
Ortholinear keyboards challenge this tradition by arranging the keys in a perfectly straight, columnar grid. For a touch typist, this can feel incredibly logical. Your fingers only need to move straight up or down from the home row, eliminating the slight diagonal movements required on a standard board. This consistency can improve accuracy and reduce finger travel.
Columnar Stagger: Designed for Your Fingers
Columnar-staggered keyboards take this a step further. They maintain the straight columns of an ortholinear board but add a vertical stagger to each column, contouring the layout to the natural resting lengths of your different fingers. Since your middle finger is longer than your index or pinky, its corresponding keys are placed slightly lower, further reducing reach and promoting a more relaxed hand posture. For many, this is the pinnacle of efficient layout design, and when combined with smart keyboard-only navigation techniques, it can lead to a significant boost in both speed and comfort.
Making the Switch: What to Expect
Transitioning to an ergonomic keyboard is a journey, and it’s important to manage your expectations.
- The Adjustment Period: Be prepared for an initial drop in typing speed. Your brain has spent years or even decades building muscle memory for a standard layout. Learning a new one, especially a split or ortholinear design, can take anywhere from a few days to several weeks of consistent practice. Be patient with yourself; the long-term comfort is worth the short-term learning curve.
- The Cost Factor: Specialized ergonomic keyboards often come with a higher price tag than standard models due to their smaller production runs, complex designs, and premium components. It’s helpful to view this not as a simple expense, but as a long-term investment in your health, comfort, and ability to work without pain.
- Is It Right for You? Before you invest, ask yourself: Have you already optimized your desk and chair posture? Do you type for several hours each day? Do you feel specific, localized strain in your wrists or forearms? If you answered yes, exploring an ergonomic keyboard is a logical and potentially transformative next step.
The Ergonomic Keyboard Spectrum
To help summarize the options, here is an expanded look at the main ergonomic keyboard types.
Conclusion
Finding the right keyboard is a deeply personal journey, not a one-size-fits-all solution. An ergonomic keyboard is not a magic cure, but it is a powerful, specialized tool designed to reduce physical stress and allow you to work more comfortably for longer. The best approach is to listen to your body and identify your specific point of pain. Are your wrists bending outward? Start by exploring a split keyboard. Do your forearms feel tense? Look for a model that offers adjustable tenting. Are you a touch typist feeling limited by a staggered layout? An ortholinear or columnar board might be your key to unlocking new levels of efficiency.
Don’t be afraid to experiment. The world of ergonomic keyboards is vast, innovative, and welcoming. By understanding the core principles behind their unique designs, you can move beyond simply tolerating your keyboard and begin the process of finding a tool that truly fits you. It’s a long-term investment in your most valuable professional asset: your own health and well-being.